DIY snowflake crystals
Mehri Sadri. 02/26/2021
With InterSTEM being based in Southern California, many of the volunteers, including myself, suffer from not-so-serious snow deprivation. Reminiscing the idea of frozen crystals falling from the sky, I took it into my own hands to create an alternate winter wonderland, one that anyone, regardless of their geographical location, can experience and enjoy.
This project is inspired by Sweet Paul.
Ingredients needed:
-Pipe cleaners to shape the designs
-Thin metal or wooden sticks
-Invisible thread that’ll be used to prop up the finished product (The thinner the material, the less noticeable it’ll be if you’d like to hang up your creations)
-Spoons, forks or any other mixing material needed (I recommend that your material is one-time use, as one of the vital ingredients to this craft, borax, can be abrasive to touch.)
-Borax (This is a common ingredient used during laundry. If you are doing this craft with kids, please make sure that they do not consume any, as it is toxic.)
Hot water (It can be room temperature, but the borax dilutes faster in a higher degree liquid.)
-Equipment that can be used to heat up substances (microwave or stove)
-Tools to measure with (cup, spoons, etc) as all the ingredients need to be added in somewhat exact measurements
-A foil or lid to cover the water
Steps:
1. Get six cups of your water (I will be making a big portion, but please feel free to scale down if you’d like to make less). If you’d like to speed up the borax dissolving process, then put the water in a microwave (in a safe container) or bring your water to a boil.
2. Once you have your finished water, add your borax, mixing with a spoon or wooden stick. For six cups of water, I had to use 18-20 tablespoons of borax. Just in case, please wear gloves when handling the powder, and make sure that all children are supervised if participating.
3. After adequately mixed (should have an off-white color), go ahead and let the solution sit for 20-50 minutes. If possible, seal the product with a towel or cap.
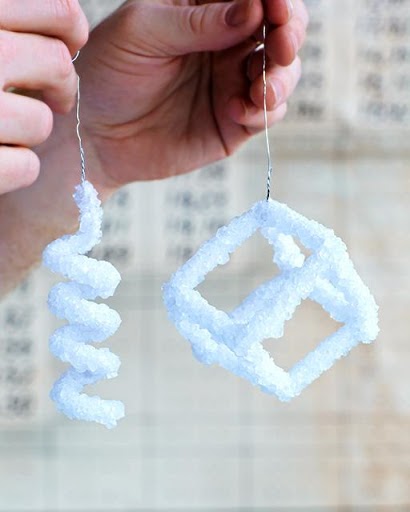
4. Now, grab your pipe cleaner and start shaping it in the shape of your desired crystal. Afterward, get your invisible thread and tie one end of it to the pipe cleaner and the other one to the wooden or metal stick portion.
5. Once your water solution is done sitting, you can take the lid off and dip your pipe cleaner into the solution by balancing the stick on the opening of the container. Avoid placing the stick in the crystal solution, but place the pipe cleaner in a position that leaves it steady and stable.
6. Cover the container holding your solution with the submerged pipe cleaner inside. Your solution will likely be a rather milky-white color. Go ahead and put your solution in a room-temperature area, allowing the crystals to slowly grow for the next several hours (this shouldn’t take more than a day, but keep an eye on it).
7. Over time, the solution should become clearer, and you should be able to see your crystals forming. After they reach a desirable size, go ahead and carefully take the pipe cleaner out. Make sure to dry it on some sort of rack so that it can dry and cool. Your creation will remain fragile as it dries, so make sure it doesn’t encounter any disturbances.
8. Once the crystal creation is dried, you’re done! Feel free to hang your art, or place it as a nice, flat piece on a table.
So, how is this possible?
Crystals grow when a saturated liquid (a liquid that can vaporize) with some sort of mineral cools. In this instance, our saturated liquid would be the borax water, while the mineral is the borax itself (borax is actually what is known as a soft crystal). When the water starts hot (hence why hot water works better for this activity), the rapidly moving molecules cling onto the borax in a sense, which is why it seems dissolved and unseen. As the solution gets colder and colder (during the few hours you wait), water molecules move farther from each other (since they bounce off of each other less and less), meaning that the water cannot hold onto the dissolved borax well. Water lets go of the borax, and it evaporates, thus creating the crystal shape you should see if the craft is done properly. In other words, as the water cools down, borax cannot sustain itself in the molecules, so it protrudes outwards, forming crystals that grow increasingly bigger as the water cools down. Thus, the longer you wait, the larger the crystals get.
Whether it be room decor or on the next Christmas tree, this simple yet elegant craft makes great use out of only a few simple ingredients.
Cover Photo: (Children’s Museum of Sonoma County)

Mehri is a senior at Scripps Ranch High School in San Diego, California. Although she has always been more inclined in humanities subjects, Mehri has found a love for combining science and art and their practicalities, and hopes to spread this same love to others with her articles.